DIY Wedding Crafts: Favors, Centerpieces and Decorations
Nineteen handmade projects, from lavender sachets to a twinkle-lit garden tent, rewritten for 2026, with honest advice on which are worth your evenings and which are better bought.
Most of the craft projects couples were making at the turn of the century still hold up, and a few look better now than they did then: lavender in lace, glass cylinders filled with fruit or shells, a pomander hung from a chair. What has changed is the arithmetic. Silk flowers, LED candles, glassware and dried bouquets are now inexpensive and easy to order in bulk, so the case for making something yourself rests on three questions: is it personal, is it pleasant to make, and can you make a hundred without losing a month of weekends?
What’s worth making in 2026
Worth doing yourself. Projects with few materials and one repeatable motion: lace sachets, glass-cylinder centerpieces, vellum luminaries over battery tea lights, votive favors, a shower towel cake, gift baskets for attendants and the invitation shadowbox. Each takes minutes per piece once you have the method.
Better bought or rented. Gel candles (a fire risk, and battery candles look nearly identical), the balloon arrangement (a balloon artist will do it faster and safer), the twinkle tent (a rental company’s tent is sturdier and insured), and anything chocolate for a summer wedding. Dried-flower arrangements are now sold widely, which makes them a project for pleasure rather than savings.
How to make 100 of anything
Build one prototype first. Make a single finished piece, time it, and list exactly what it used. That list, multiplied by your count plus ten percent for mistakes, is your shopping list.
Run an assembly line. One person cuts, one ties, one glues, one packs. Single repeated motions are much faster than four people each making whole pieces, and the results match.
Host a craft night. Invite your attendants, set out stations, provide dinner, and set a realistic target. Two or three evenings finish most favor projects.
Do the buy-versus-make check. Divide the materials cost by the number of pieces and add a fair value for your time. If the handmade piece costs as much as a bought one and is no more personal, buy it. Our wedding budget guide has a line for decor and favors; keep the crafts inside it.
Timeline and supplies
Start two to three months out. Prototype in month three, buy in bulk and produce in month two, and leave the last four weeks for packing and labeling by table. Anything perishable is made in the final day or two. The 12-month planning checklist shows how this fits around everything else.
Craft chains such as Michaels and Hobby Lobby carry ribbon, foam, wire and silk stems. Online bulk sellers such as Save-On-Crafts sell cylinders, votives and tulle by the case. Thrift stores and resale groups are full of glassware from other people’s weddings, the most sustainable source. Settle your palette before you buy a spool of ribbon; see choosing your wedding colors.
Favors
First decide if you need a favor at all; our guide to wedding favors explains what guests actually take home. One per household is correct.
Ten-Minute Lavender Pomander
A ball of dried lavender tied with raffia and topped with rosebuds makes a fragrant favor, a chair-back decoration or an attendant’s gift, and suits a Victorian or winter wedding.
Materials: a 3-inch lavender sphere, nine strands of raffia, nine dried rosebuds, about 17 dried myrtle leaves, a stem of caspia, floral wire, hot or tacky glue.
- Knot four raffia strands at their center, set the knot under the ball, and bring the strands up opposite sides to knot on top. Repeat with four more, offset, so the ball is quartered.
- Tie the top ends into a bow. Loop the last strand, wire its knot, and push the wire in behind the bow as a hanger.
- Glue rosebuds around the bow, leaves around the roses, and short sprigs of caspia among them.
About ten minutes each once you have the rhythm; lavender spheres are sold online in bulk.
Chocolate Candy Spoons
Plastic spoons set in molded chocolate become coffee stirrers or a single sweet bite. They are inexpensive and fast in volume, with one limit: chocolate does not survive a hot room.
Materials: a spoon candy mold, plastic spoons, white or dark melting chocolate, small clear candy bags, tulle, 1/8-inch ribbon, optional baby’s breath or pearl sprays.
- Melt the chocolate, fill the mold and press a spoon into each cavity. Chill until set.
- Bag each spoon, wrap it in tulle and tie with a small multi-loop bow.
- Tuck baby’s breath or a pearl spray into the bow.
Modern update: make them no more than a week ahead and store them cool. For an outdoor or summer wedding, choose another favor. Add a small ingredients card, since chocolate usually contains milk and soy and is often made alongside nuts.
Hershey’s Kiss Rosebuds
Two Kisses wrapped in cellophane on a wire stem look like a rosebud. Set one at each place, or gather two dozen in a vase as a centerpiece guests dismantle at the end of the night.
Materials: Hershey’s Kisses, double-sided tape, colored cellophane in 4-inch squares, 18-gauge florist wire (halved for short stems), green floral tape, optional silk leaves.
- Tape two Kisses together, base to base.
- Center one tip on a cellophane square, wrap it up around both, and twist the corners together at the other tip.
- Push a wire into the twist until it meets the chocolate.
- Wrap floral tape over the twist and down the wire, adding a leaf if you like.
Each takes two or three minutes. Keep them out of the sun, and note on a card that Kisses contain milk and soy.
Lavender Lace Sachets
Three small lace pillows of lavender, stacked and tied with satin ribbon, are among the cheapest and most useful favors here. Guests put them in a drawer or suitcase.
Materials: a 10-inch square of white lace, a quarter cup of dried lavender (with rose petals if you like), 24 inches of 1-inch satin ribbon, thread, fusible web and an iron.
- Cut the lace into four squares and use three.
- Fold each into a rectangle, press, and sew one short and one long side. Fusible web works if you don’t sew.
- Turn right side out and fill until plump.
- Fold the open edge in and seal it with fusible web.
- Stack the three, tie the ribbon around them, and cut the ends on a V.
Modern update: with a sewing machine and an assembly line, a set takes about ten minutes. Linen or cotton gauze looks fresher than lace.
Fabric Rice Roses
A square of silky fabric rolled into a rose holds something for guests to toss at the send-off; a vaseful by the exit doubles as decoration.
Materials: 5- or 6-inch squares of crinoline or similar fabric, wired wooden floral picks, silk leaves, green floral tape, filling.
- Fold the square in quarters. With the uncut corner up, roll the sides toward the center into a cone, leaving a small opening.
- Push a pick up through the bottom, gather the fabric around it and wrap the wire tightly.
- Cover wire and pick with floral tape, adding a leaf.
- Fill with a small spoon or funnel.
Modern update: many venues no longer allow rice or birdseed, which make walkways slippery. Fill the roses with dried lavender or petals, or give them empty and hand out ribbon wands for the exit. Ask what your venue permits.
Stamped Vellum Bags and Cards
Translucent vellum, stamped and heat-embossed, carries one motif across favor bags, invitation overlays and thank-you cards.
Materials: 8 1/2-by-11-inch vellum, a rubber stamp, pigment ink, embossing powder, a heat gun, double-sided tape, a hole punch, sheer ribbon, cardstock.
- Emboss: stamp the vellum, sprinkle powder on the wet ink, tap off the excess and melt it with the heat gun.
- Bag: wrap the sheet around a box-shaped form, tape the seam, fold and tape the bottom like a parcel, remove the form and crease the sides. Fill, fold over the top, punch two holes and thread ribbon through.
- Card overlay: lay printed vellum over a decorated card, punch two holes at the top and weave ribbon through both layers.
Modern update: print wording on the vellum and keep embossing for the motif. Vellum is flammable, so keep it away from candles. For wording and assembly, see assembling wedding invitations.
Vellum Votives
Vellum collars cut with decorative scissors and punched like lace turn plain votive cups into luminaries. Clustered on a tiered stand with ivy, they make a centerpiece guests take home piece by piece.
Materials: glass votive cups, colored vellum, decorative scissors, a 1/16-inch hole punch, stamps, gold embossing powder and pad, a craft knife, ruler and white glue.
- Cut a strip about 3 to 3 1/2 inches tall, slightly larger around than the cup.
- Scallop the edges and punch a hole in each scallop.
- Stamp and emboss, or glue a contrasting vellum heart behind a stamped area. Hold it to the light as you work.
- Glue into a ring, clip until dry and drop over the cup.
Safety: vellum is flammable. Use battery tea lights inside, not real flames.
Tulle-Wrapped Votive Favors
A colored votive wrapped in tulle in a decorated glass cup is a simple favor that also lights the table. The same wrapping works for Jordan almonds.
Materials: clear votive cups, votive candles or battery votives, tulle, 18 inches of 1/8-inch picot ribbon each, rub-on decals, baby’s breath, pearl sprays.
- Apply a decal to each cup.
- Wrap the candle in tulle and tie a multi-loop bow: wind ribbon around two fingers several times, cross the ends, tie them around the middle, slide off and fluff.
- Tuck in baby’s breath and a pearl spray; set the candle in the cup.
About three minutes each with pre-tied bows. Safety: tulle must come off before a real candle is lit, so if these also light the tables, use battery votives. Check that your venue allows open flames, and never leave candles burning unattended.
Centerpieces
Centerpieces are where DIY saves the most and costs the most time. Keep the design simple enough to repeat, and make a spare.
Classy Glass Cylinders
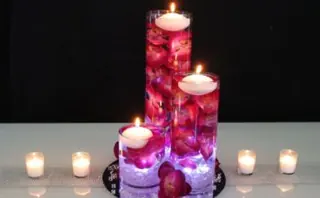
A clear cylinder of water filled with lemons, cranberries, shells, pearls or flower heads is the most adaptable centerpiece here and easy to make in quantity.
Materials: glass cylinders in one or several heights, distilled water for fresh fillers, floating candles or floating LEDs, fillers, optional ribbon.
- Wash the cylinders and test your fillers: some float, some sink, and foam bobs up unless weighted.
- To suspend a heavy item, tie it to clear nylon line and glue the other end to the outside of the glass under a ribbon.
- Fill with water and arrange with long tongs or a skewer.
- Add the floating light at the venue.
Modern update: buy cylinders in bulk or secondhand. Refrigerate fresh fruit until the day; metal rusts in water. Many venues restrict open flames, and floating LEDs are convincing.
Lights of Love Centerpiece
Three plastic pedestals of staggered height rise from a dish of faux water and glass gems, each holding a votive above a small arrangement.
Materials: three 14-inch plastic pedestals with rings, a glass dish, two-part faux-water resin, glass gems, floral foam (and a small cup for fresh flowers), flowers, three glass votive cups, adhesive putty, hot glue.
- Cut two pedestals shorter than the third and glue the rings on top.
- Glue the pedestals upright in the dish.
- Pour the mixed resin, add gems everywhere except the center, and set the cup or foam there. Straighten the pedestals now; once set they cannot move.
- Cure at least 24 hours, then arrange the flowers.
- Fix the votive cups to the rings with putty at the venue; assembled, the piece is too top-heavy to transport.
Modern update: at this height, use battery votives, which are safe near sleeves and centerpiece greenery.
Topiaries
A small topiary stands above the table without blocking conversation, and afterward makes a gift for attendants or a donation to a care home.
Materials: pots, floral foam, a foam ball or cone, a dowel or branch, moss, flowers and greenery, ribbon, hot glue, floral pins, chenille stems.
- Glue foam into each pot to two-thirds full and cover with moss.
- Cut the trunk with angled ends, push one end into the pot and set the ball or cone on top.
- Cover the ball in moss, then glue on flower heads; or spiral ivy garland up a cone and pin it.
- Tie ribbon at the trunk.
Tied version: bind a tight bunch of fresh stems with a chenille stem under the heads and again at the base, cut 3 to 4 inches longer than the finished height, and push into the foam.
Modern update: preserved boxwood balls are sold ready-made. For fresh versions, check our guide to flowers by season.
Towel Cake Centerpiece
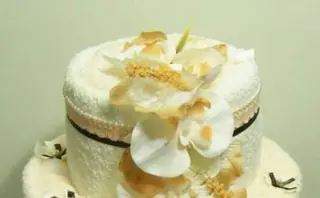
A three-tier “cake” of rolled bath linens is a shower centerpiece the couple takes home and unrolls. Towels from their registry make it a gift as well.
Materials: four bath towels, four hand towels, four washcloths, a 1/4-inch dowel, large safety pins, glass-head pins, silk flowers, ribbon, a bow or bath puff for the top.
- Fold each bath towel lengthwise in quarters, lay them end to end with slight overlaps, roll tightly and pin.
- Repeat with the hand towels and washcloths for the upper tiers.
- Cut the dowel to the stacked height, push it into the bottom tier and slide the others on.
- Tuck silk flowers into the folds and pin on ribbon or pearls.
Modern update: never glue anything to the towels, and lift the cake only by the bottom tier.
Decorations
Large decorations depend on venue rules, weather and transport. Get approval before you start.
Balloon Elegance
A foam-weighted bag holds small pearlized balloons on sticks, gold foil leaves and a few heart balloons tethered on tulle, for a table or an entrance.
Materials: a gift bag, foam blocks, a dozen 5-inch pearlized balloons, a few 11-inch heart balloons, balloon sticks and cups, gold foil paper, 18-gauge wire, tulle, corsage pins, clear tape, helium and a float treatment such as Hi-Float.
- Fill the bag with foam.
- Inflate the small balloons partway, fix them to sticks and tie tulle bows at the cups.
- Insert them into the foam, tallest at the center.
- Cut 7-inch foil leaves, tape wire to the backs and fan them around the balloons. Hide exposed foam with tulle.
- Treat and inflate the hearts, tie them on long tulle tails, weight the tails and drop them into the arrangement.
Safety: latex can cause serious reactions in people with latex allergies; use foil balloons if anyone attending is affected. Never release balloons outdoors: releases harm wildlife, several states and many venues restrict them, and foil balloons in power lines cause outages.
Perpetual Blooms
A square wreath of garden flowers lies on the table around a hurricane shade as a fresh centerpiece, then dries into a wall hanging.
Materials: baby’s breath, amaranthus, heather, hydrangea, larkspur, delphinium, lemon leaves and bear grass; four trays of wet floral foam; floral adhesive, plastic wrap, wire and picks, an awl, foam board; a hurricane shade and battery pillar candles.
- Butt the foam trays into an open square and tape the joints.
- Soak the foam and bind the square in plastic wrap.
- Insert lemon leaves around the base, then heather, piercing the wrap with the awl.
- Cluster delphinium, amaranthus and larkspur at the corners; wire small hydrangea clusters and baby’s breath along the inner edge.
- Pick bundles of bear grass into each corner.
Fresh, it lasts about a week to ten days with moist foam. Dry extra hydrangea and baby’s breath separately, since they shrink most, and glue them in later before backing the piece with foam board and a wire hanger.
Twinkle Tent
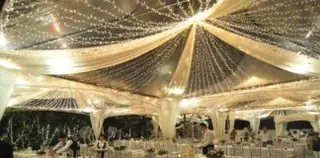
A market umbrella dressed in cheesecloth, fabric rosettes and white lights becomes a canopy for the cake, the gift table or photographs outdoors. It is a weekend project for several people.
Materials: a market umbrella with a staked or weighted base, about 70 yards of cheesecloth, 3 yards of striped cotton, twill tape, fabric-covered buttons, fiberfill, stem wire, LED string lights, twist ties, silk flowers.
- Drapes: stitch two cheesecloth panels per section to twill tape, leaving tails for tying.
- Trim: gather striped fabric into stuffed rosettes with button centers, and sew gathered tubes to sleeve the pole.
- Assembly: sleeve the pole, secure the umbrella on level ground, and wrap lights up the pole and along each rib.
- Tie the drapes between ribs, swag cheesecloth around the top edge, and wire rosettes and flowers at each rib.
Safety: use LED lights, which run cool, and check with your venue before hanging fabric or lights. Take the tent down if the wind rises.
Keepsakes and Gifts
Gifts for attendants are needed by the rehearsal; the shadowbox can wait until after the honeymoon.
Champagne Gel Candles
Clear candle gel tinted pale amber in a champagne flute looks like a glass of sparkling wine, bubbles included.
Materials: heavy flutes, clear candle gel, amber and brown dye, a long wax-coated wick with a metal tab, wick stickers, a candy thermometer, a metal pan.
- Fix the wick tab to the center of a clean, dry flute with a sticker.
- Melt the gel slowly, watching the thermometer and staying under the manufacturer’s maximum temperature. Never leave the stove.
- Add dye a flake at a time, testing the color in a clear glass.
- Coat the wick, then pour, clipping the wick straight until it sets.
- Rest overnight; the bubbles are part of the effect.
Safety, plainly: gel candles burn hotter than wax, and thin glass can crack. Use only heavy glass made for candles, keep them away from fabric and flowers, never leave them unattended, and confirm your venue allows open flames. For the reception, use LED candles instead.
Do-It-Yourself Gift Baskets
A themed basket is one of the best thank-yous for attendants, parents or the friend who addressed your envelopes, because it can be matched to the person.
Materials: a container (basket, mug, colander, watering can), excelsior or paper filler, the gifts, ribbon or raffia, a few silk stems, cellophane or shrink wrap and a hair dryer.
- Choose a theme: coffee and biscotti, kitchen tools inside a mixing bowl, or bath things in a clay pot.
- Fill the container with filler and fluff it.
- Set the tallest item at the center and work down toward the rim so everything shows. Roll linens; tuck filler between items.
- Wrap in cellophane gathered at the top, or shrink wrap heated with the dryer, and tie with a bow.
Modern update: a reusable tote or crate can replace the wrap. Allow about an hour per basket.
Sweetheart Basket
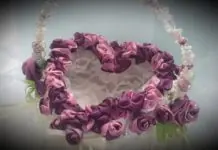
A small heart-shaped basket edged in hydrangea and rosebuds holds a flower girl’s petals; several filled with favors can serve as centerpieces.
Materials: a 5-inch heart-shaped basket, a 5-inch heart doily, 4 feet of 1 1/2-inch sheer ribbon, one dried hydrangea bloom, 90 to 100 dried rosebuds, floral wire, hot glue.
- Line the basket with the doily.
- Weave ribbon around it below the rim, or glue it on. Wire a small four-loop bow and glue it near the handle.
- Glue small hydrangea clusters around the rim, letting some spill over.
- Glue rosebuds in clusters among them, facing every direction.
About an hour. Modern update: ask whether your venue permits petals in the aisle, and whether they must be silk or fresh.
Victorian Invitation Shadowbox
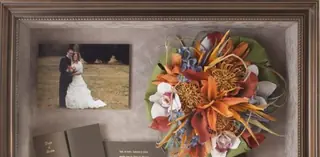
A shadowbox gives your invitation a place on the wall instead of in a drawer, with room for flowers from your bouquet.
Materials: a shadowbox sized to the invitation, a sponge brush and gold paint or stain, a paper doily, craft glue, silk or preserved flowers, dried baby’s breath, ribbon.
- Paint the frame and let it dry overnight.
- Glue the doily to the backboard.
- Center the invitation on the doily.
- Glue flowers and baby’s breath at opposite corners.
- Glue ribbon around the invitation in a loose heart.
- Reassemble with the glass.
Modern update: mount the invitation with acid-free photo corners rather than glue, so it can be removed later, and hang the box out of direct sun. It suits a Victorian theme.
Written and edited by the Today’s Weddings editors. How we research and check what we publish is set out in our editorial standards. Spotted something wrong? Tell us.